REVIEW | COLOUR XTREME HAIR ART SPRAY
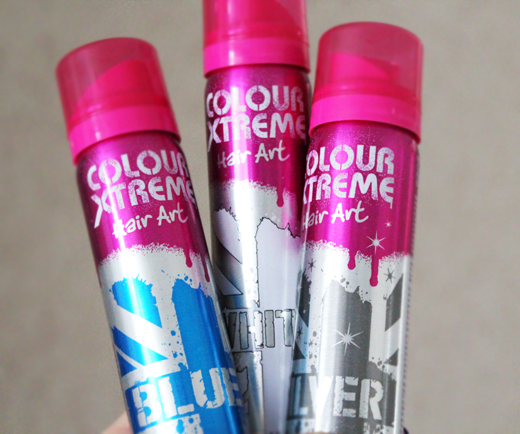

I do have quite the fascination with wigs and the possibility to change your hair colour/style after how you're feeling from day to day [yes, yes, even though my hair has now been blonde for the past 12 years] so the Blue, the White and the Silver were my picks when doing some online shopping a while back and the Blue definitely is my favourite so far since you really get the colour you're expecting.. and if you prefer it lighter then just add some of the White spray on top. The White is also great for spraying onto areas which may need some light if your base colour would happen to get a little patchy or if, let's say, you're going for a blue or pink dip-dye and want the colours to be baby blue and baby pink. The Silver one was a joke and I am genuinely chocked that this is even allowed to be on the market. No colour whatsoever and the glitter was microscopic.

♦ HOW?
You simply spray it onto your hair with a 20-30 cm distance and please use it BEFORE putting on your makeup (that is if you're using it all over as I did). AND yes, the blue one IS apparently showing up on dark hair as well! Wohoo!
♦ WHERE?
For Swedes, Eleven.se has got the lowest price and is where I bought mine. Abroad you can find them at Boots, Urban Outfitters, ASOS and other websites along with their own colourxtreme.co.uk if you're in the UK.
EVENT | MAC TECHNIQUES


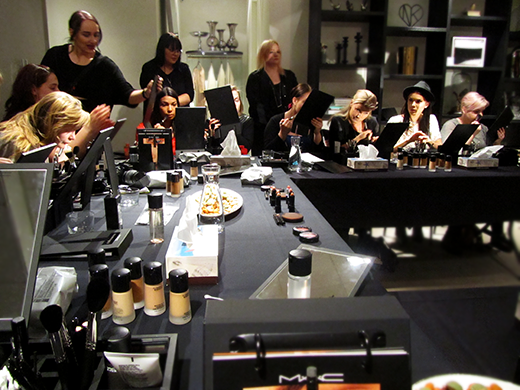
They sure did go all in, inviting those of us who are not actually living in Stockholm to spend the night at the absolutely beautiful hotel Nobis where they also treated us with a 3-meal dinner and the WONDERFUL news that Sweden FINALLY got the MAC PRO-card system (!) and will from now on also carry some of the PRO items at the NK counter.
A huge thank you to Berit and MAC Cosmetics for this wonderful evening and all the exiting news - and of course the very generous goodiebag! I've found some real gold gems which I can not thank them enough for including since I don't think I would have purchased some of them myself just by looking at them. Tricky little thing knowing which products you will come to love once you've tried them out properly. I'll show you my absolute favourite soon!
(1st photo belongs to meandme.se)
POP ART - PART II
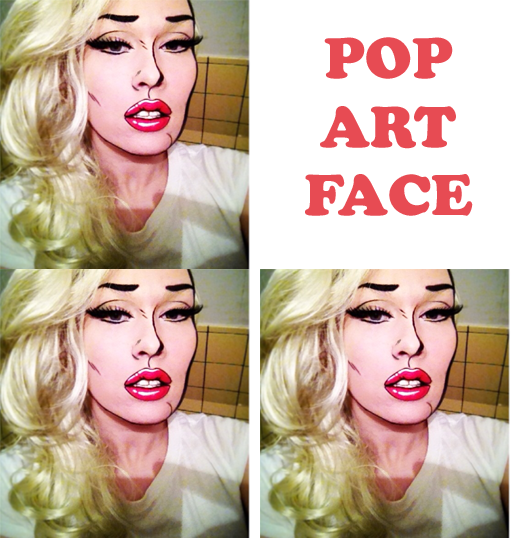
When creating your base, use a high coverage foundation to blank out the face and try to make the face as "flat" as possible. Lighten up the parts that have a bit of natural shadow and maybe flatten areas that pop out a lot if you feel the need. From there you can use an inspirational picture (maybe from a cartoon book or by just typing "pop art girl" into google) so you can get some ideas on where to place the lines on your face. Some may prefer to do this look with only a few lines here and there while others prefer to also put dots all over the face for the typical cartoon magazine paper effect if you know what I mean - it all depends on how simple you want it and basically what you prefer.
I always thought that when I finally did try this look, I would be going for the dotted version [I've been wanting to try it out for years, since I first saw it on an old MAC halloween face chart] but I finally went with just the lines - and the lips of course! This was just my first try and I wasn't meant to post it but thought "Oh what the hell" ... Sometimes it's fun to post the things you've made just so you can look back on it after some time and notice the things you would have done different today... so for me personally it's a good way of growing as an artist and that's why this will be one of the looks I'll be recreating for Halloween 2013 - and it might be a how-to video!
For lashes I would recommend big ones that looks full and thick instead of simple ones since you don't really see a lot of thin, natural lashes in pop art magazines (or at least I haven't) but more like a thick flick. And that being said - don't forget a thick eyeliner!
